Showing posts with label Fort Worth MUA. Show all posts

Thursday, February 26, 2015

Don't be So SENSITIVE! Three ways to remove makeup that won't sting your eyes....

I'm talking about your eyes, not your feelings!
 Do you have sensitive eyes?  I do!  For the longest time, I was on the search for any makeup remover...literally ANY I could find that didn't sting my eyes when I took off my eye makeup each night.  Everything I tried, from expensive to drugstore, no matter how highly recommended....just stung like crazy and made my eyes red and watery!  After years of trial and error, plus some research and in one case... a trip to the eye doctor....I have three makeup remover options that work well for me.....
  

Baby Your Eyes!

Years ago, I scratched my cornea and had to go to the eye doctor.  I got meds (drops, I think) and the doc told me to not use any makeup (gasp!) and no cleansers of any kind except baby shampoo. Um...what?  At the time, I thought it was a weird suggestion, but it really makes sense if you think about it.  If baby shampoo won't make your 4 month old cry, surely it won't make YOU cry, right?
So, for about a week I wore no makeup and washed my face with baby shampoo.  A little drying on my skin, but definitely no irritation on my skin OR eyes.  Once I started wearing makeup again, I thought I'd try removing my eye makeup with it....and it worked really well!  The PH balanced
formula doesn't sting.

The Good: 

  • Cheap!  Get a big bottle of J&J brand at Target for $4.50, (cheaper if you get generic) the price is tough to beat. 
  • Multi-purpose - use on your toddler's hair, use as body wash, use to wash out lingerie (check out my article here for more on this beauty hack, plus others!)
  • No tears, Ph balanced formula is gentle on your baby, and you
  • Did I mention it's really cheap!?!
The Bad:
  • It's a little messy...you have to smear it all into your eyemakeup and then wash it off.
  • Doesn't remove waterproof gel liner and waterproof mascara very easily
  • Make sure you get plain, traditional baby shampoo...if you choose one with fragrance or other things added to it, you'll negate the "no irritation" aspect.  I always choose Johnson and Johnson No Tears...kickin' it old school.

Those Awesome Green Wipes

When working with clients, I need makeup wipes for quick cleansing before an application or a lesson.  There are tons on the market, but Garnier's The Refreshing Remover Wipes are my hands down favorite (clearly!  I've mentioned them here and here)!  Why?  Obviously, they don't sting my
eyes, but there are a whole bunch of other reasons too:

The Good:
  • Great smell - very fresh and clean
  • Affordable - About $5.99 for a pack of 25 (often on sale for $4.99)
  • Portable and easy - I pack them in my kit, my purse, even my nightstand for quick makeup removal before bed
  • Easy to find at Ulta, CVS, Target, etc.
  • Gentle formula - no residue.  Many wipes leave an oily film, these don't...skin feels very clean
  • Removes makeup really well...even waterproof stuff.
The Bad:
  • I go through soooo many of them, that they cease to be affordable to me.  Last year alone I bought 75 packs, so at $5 a pack?  Yikes...one of the more expensive options.  You wouldn't go through as many as I do, obviously, but you do pay for convenience when you purchase pre-moistened wipes.  That's about it!  No other negatives I can think of.
Remove your Makeup....with Water?

Yep, water!  How you ask?  Well, not just ANY water, but Micellar water.  Micellar water has been around for years, it's really popular in France and Korea, and makeup artists love to use it backstage for fashion shows where makeup has to be done and then redone quickly.  Why?  Micellar water cleanses with little micelles...molecules suspended in the water that attach to dirt and oil like a magnet!  Simply apply to a cotton pad and swipe to remove makeup...keep going until the pads aren't
dirty anymore.

The Good:
  • It's water, so absolutely no stinging or irritation of any kind!  Love that...
  • Super gentle on the rest of my skin as well
  • Perfect used with a Q-tip to clean up winged liner or a random mistake
  • Removes makeup pretty well, without using a lot of chemicals and no dyes or perfumes.
  • Pair with a sleeve of cotton pads and you're all set...easy and quick
The Bad:
  • Somewhat expensive.  I purchased Bioderma Crealine Cleansing water on Amazon for $14.42 for 100 ml, a fairly small bottle.
  • Not as accessible as other cleansers.  I checked a few beauty stores that had no idea what I was talking about before I ordered online. You can't pick this up at CVS.....
  • If you have a full face of makeup, it might take 5-6 cotton pads to get it all off, which takes longer than other methods.
So there you have it, not one, not two, but THREE options to remove your eye makeup for those of us with sensitive eyes.  Do you have another favorite remover?  Have you tried any of my favorites? Share in the comments below!

Monday, January 26, 2015

Secrets to Making your Forehead look Smaller...really! (Daily Makeover Feature)


Ever heard the term "fivehead" in reference to someone with...ahem...a lot of real estate north of their eyebrows?  As someone who actually has a fairly high forehead.... I completely get that!  When my hair is pulled back, I just feel like there is a LOT of space between my eyebrows and hairline.  Tyra Banks is one notable celeb who has commented on her acceptance of her high forehead..she's so down to earth, and beautiful, of course!  If you feel your forehead is too high and aren't quite ready to just embrace it, what can you do? Recently, I got a call from popular beauty blog Daily Makeover wanting tips to share with their readers on how to utilize tips and tricks to minimize the forehead area....here they are:

Cut Bangs - #1 tip and the quickest solution!
Bangs easily cover forehead surface area and bring the focus back down to your eyes... the best feature on most faces.  Bonus?  A soft, modern fringe can make you look years younger, and can totally negate the need for Botox!  Make sure your stylist cuts bangs in a flattering shape that blends into the rest of your hair, and get frequent trims to keep them in shape.  Check out the before after on Christina Ricci below....when she ditches the center part and wears bangs, her eyes command so much more attention, and her overall appearance is much more balanced. 
Since your
eyes really will be the main attraction, so be sure to play them up with plenty of shadow, liner and mascara! A soft bronze or shimmery taupe shadow with classic black liner and mascara looks good on everyone and works for any situation.  Feeling bold? Go for a smoky eye in plum or gray....universal shades that work on anyone and are easier to wear than black.

Subtle Contouring -  

The key is to use two shades of foundation...the first one should be just 1 shade above your natural skin tone, the second one should be 1 shade darker than your skin tone.  Let me repeat...just one shade difference!  You're looking for a very subtle trick of the eye, so don't go too dark or too light, or it will look too harsh.  Dot the lighter one in the center of your face nose, forehead, cheeks chin, and blend well with a dampened Beauty Blender or foundation brush.  Lightly dot the darker one
around the perimeter of your face...very top of forehead, temples, jawline, under chin....dot on sparingly and blend well, so that the two shade are blended perfectly.  There should be no obvious lines or streaks on your jaw!  This technique is a more subtle version of highlight and contour, but when done correctly, it results in a soft and flattering "halo" effect that will pull the eye towards the center of your face and minimize your forehead.
Eyebrow Love -  brush those babies up

If you have a larger forehead, it's vital that you ensure your brows are shaped, properly, defined and brushed upward. Brushing your eyebrows up and into place can lift your face and minimize the distance between your eyebrows and hairline, plus it opens your eye area and creates a balanced look.  If your brows are sparse, fill in a bit with pencil, powder or pomade....just be sure to use short, hair like strokes in a shade that matches our brows for the most subtle look, and keep it all in place with a dab of brow pomade or clear mascara on a spoolie or eyebrow brush. Brows frame your entire look!  If you don't do anything with your brows now, you'll be amazed at the difference it makes when you give them a little attention....

Wear a Bright Lip - 
If you have medium to full lips, this technique works especially well. Wear a bright red or berry lip (tip - a sheer berry works on every skin tone) to pull focus from your forehead and call attention to your rosy pout and pretty smile.  Color on your lips prevents a "monochrome" look....If your face is all neutral, your forehead will really stand out. Remember, it's all about creating balance in the face and calling attention to features you like, while distracting from those you don't!

Some of my tips, plus more from other beauty pros were featured in Daily Makeover...click here to read this article, plus tips on everything beauty from A to Z!

Tuesday, January 13, 2015

Unexpected Power Nap? Beauty Tips to Hide the Evidence! (Makeup.com feature)


Let's face it, a well timed power nap can be a lifesaver!  I've been known to work from 6am-6pm on a busy Saturday, then hit the couch for a few minutes of zzz's so I can stay awake at dinner for date night. You've gotta do what you can to keep moving, especially in the  middle of wedding season!  Or maybe it's 2pm on a work day, the carb crash sets in and before you know it, you're nodding off at your desk in between meetings.  Studies show that power naps (ideal time is 20 minutes) can be great to restore your mood, energy and productivity, but they sure can wreck your makeup.


So,...whether you're snagging a little shut eye behind closed doors in your office or dozing on the couch at home....how can you look as fresh as you feel after a nap? And NOT to look like a groggy, smeared mess?  Makeup.com wanted to know, so I shared a few of my favorite couch/desk tested tips......


Ice, Ice Baby!

One of the best tricks is to use one of those gel masks you keep in the fridge...
They are super cheap, super easy to use and can reduce puffiness like nothing else! Simply apply to your eye area for a few minutes. Don't have an eye mask?  Use a cold pack or heck, even a package of frozen peas! The cold will energize you, wake up your face and will reduce the puffy eye look that can accompany a mid-day nap.  If you use something frozen, put a thin towel between it and your skin to avoid redness.  (Bonus?  You can also use your cold eye mask anytime for bumps and bruises too....)


That word we all hate....MOIST
(Ugh, I only like that word when referring to chocolate cake, but I digress...)
Seriously....if you have dry skin, a nap will make your skin look parched! Upon waking, you need moisture, ASAP. If you don't have time to reapply everything, simply apply a little oil free moisturizer right on top of your makeup...just use it sparingly.  After that, spritz with Evian water or a hydrating product like Mac Fix+ spray to infuse even more moisture back into your skin.  To finish, I like to take a dampened Beauty Blender and bounce it (a light stippling motion, not rubbing) on my foundation lightly to make sure everything is smooth and blended. When you just can't redo your makeup...this approach works really, really well to rehydrate and refresh your whole look, and it just takes a minute or two!


Want to know even more?  Check out the article featured in Makeup.com with additional "hide the nap" tips from me,   This site is chock full of articles and tips on all things makeup and beauty....you'll be adding it to your favorites list for sure.

Best tip?  If you can, train yourself to sleep on your back like this little guy....if you do, there's  lot less to fix when you wake up.   For the rest of us who sleep with our faces smashed into the pillow...or keyboard....try these tricks next time you've just gotta take a nap, and no one will be the wiser!

Really just  needed an excuse to post this picture... ; )


Wednesday, October 15, 2014

6 Reasons Why You Need A Pro Makeup Artist for Your Wedding

When talking to booked brides, prospective clients and other wedding vendors, I'm often asked "What's REALLY different about using a pro to do your makeup on wedding day?"  I thought to myself...GOOD QUESTION!

So, what IS different about having a pro artist apply your makeup on your wedding day?  A LOT!  In this age of DIY, many of you really want to know exactly what you're getting when you hire a pro versus doing your own or having a friend help out.  What are you paying for....what goes into it? When it comes to wedding day makeup, here are just a few reasons why you should hire a pro:
In My Kit.....

1. Quality Products  - Pro artists have tested products extensively and know what works and what doesn't, and it's definitely not about buying the most expensive or trendy cosmetics, either.  I test every potential new product on myself for a month...if it passes the test of no irritation, looks great, performs well,  has plenty of pigmentation, lasts all day....then I purchase another one for my kit....I don't care if it costs $5 or $50, it must pass the test.  Random  and untested stuff doesn't go into pro kits, we can't risk it!  Most bridal MUA's use a combination of prestige products, pro brands and drugstore finds that we know perform under pressure.
Set up and ready for wedding day!
 We have thousands and thousands of dollars worth of product, tools and brushes to accommodate any skin tone or situation and we know what's in our kit not only looks beautiful, but really works and lasts the way it's supposed to.  You'd spend far more than our wedding day fees to go out and purchase all of the products and tools we're gonna use to make you gorgeous, that's for sure! You can't create a beautiful look without the right products and tools....we've got 'em and know how to use 'em.

2. Knowledge - As Pros we know how to blend to get the perfect shade of lipstick, exactly what eye shadow will make your hazel eyes pop and which foundation will look best on your Mom's dry skin. Through education and years of experience, I can look at each woman and know how to enhance her features in the best way possible based on her style, bone structure and face shape....it's what artists do!  Your everyday makeup is probably just fine...for EVERYDAY.  This isn't just another day at the office...this is your wedding, it's vital that you look your absolute best!  You need makeup in the perfect shades for you that has been blended properly, with lashes the right length and shape for your eye shape....and all the
Vanja D Photography
other details that go into a flawless face.  We know how to take your inspiration photo and translate it into your dream wedding day look, but we'll also use the experience we have to steer you away from too much contour or convince you to try a brighter lip that fits your personality.  We know what works best...for YOU!


3. Technique - This goes along with knowledge, obviously, but it's more about HOW pros apply products versus how you do it at home.  You can have top notch products and still get crappy results if they aren't applied the right way!  Certain products require a degree of manipulation that few amateurs really understand....which primer to use with certain skin types, choosing brow powder or pomade, which foundation will cover a specific complexion issue, which shimmer powder will produce the look that you've pinned over and over on Pinterest.  When to use brushes, when to blend
Lightly Photography
with a sponge, what size brush to use to achieve a certain effect.....we've developed all of these techniques over the years.  Take that PLUS the great products? It results in the ultimate goal...flawless wedding day makeup that enhances your features in the best way possible.

4. Makeup that LASTS - how many times have you done makeup on yourself...just to look in the mirror at lunch and realize it totally disappeared?  This is a common complaint I hear from clients all the time!!  Yet another reason why you need to book a pro, because we use primers, sealers and application techniques that result in a long lasting and totally budge-proof look. Staying power like that is very difficult to accomplish on your own, especially when you're talking photos, ceremony, reception....it can be a long day.  Something many of us do?  When we get pics back from photographers, we skip to the last photos!  Personally, I love to see that the makeup still looks good and hasn't faded, and I always check (just like in the example below from Katherine's wedding last year!)  Wedding day makeup has to last a minimum of 12 hours,  a pro can create the perfect look that lasts from the first kiss to the last dance.

Tracy Autem Photography

5. Specialized Customer Service - We KNOW weddings, inside and out.  After 20 plus years, I have seen, heard and experienced nearly everything you can imagine on wedding day, and I know how to handle it.  Ice storm and bridesmaids are 3 hours late?  Been there, done that.  Bride getting stressed and needs someone to hand her a cocktail and remind her to breathe?  I'll be your bartender/counselor for a few minutes!  Bridesmaid needs to be talked into wearing more makeup than just Chapstick?
 I'll figure out how to get her just glam enough without pushing her too far out of her comfort zone.  Makeup artists who specialize in bridal makeup know all of this, and a whole lot more!  We know exactly how long it takes to do makeup for each person as well as take care of details so that all you and your girls have to do is sit back and get beautified.  Incidentally, do make sure the makeup artist you choose DOES have bridal experience.....this isn't the time to try out a newbie who's never dealt with a cranky bridesmaid who's hungover from the rehearsal dinner, a variety of skin tones and ages that all require different products or an anxious mother who's never had her makeup professionally done.  Pros who specialize in weddings will make your day easy and stress-free, just like you expect from all of the other vendors you've hired.
Jenny Martell Photography

6. Photos and Video You'll Love - Last, but definitely not least....photos and video.  You've spent thousands on choosing the perfect photographer and videographer....this is NOT the time to scrimp on makeup and hate the results of their hard work!!   Ask any wedding vendor, and they'll tell you....bad makeup can ruin the bride's day, but it will also ruin photos and video as well....and poof!  There go your memories.  It's not easy to craft a makeup look that is equally stunning in person AND in photographs, but a pro does exactly that.  You'll look fabulous as your new husband sees you up close, but you'll also look great in the photos and videos too...this is crucial. You'll be so glad you hired a makeup artist every single time you open your wedding album or watch your wedding video!


Well, there you have it....and honestly, there are even more reasons I'm not listing!  It's more fun, more luxurious, less stressful....on and on. I've covered a few more reasons to hire professional makeup for not just you, but your entire wedding party in this article , so be sure to check that out too! (Hint...a consistent look makes all the difference!) 
So...whether you want to book me or another DFW area artist, or even if you're reading this in
Lifestyle Portrait Photography

another city or country and are considering hiring an artist where you live....think about all of these reasons as you budget for wedding day beauty.  Sure, it's not cheap to hire a talented and reputable makeup artist, but it's a worthwhile investment, and a vital element that can make or break your wedding.  You've only got one shot to look amazing on your big day, so don't take chances.   My wish for all of you is to look as lovely and happy as these brides did on their wedding day...you DESERVE it!

(Makeup in all photos by Jennifer Trotter of  Lip Service Makeup)

Wednesday, September 10, 2014

BRIDES.COM Wedding Day Pro Tip - Mess Free Snacking Pre-Ceremony!

I recently spoke with Brides Magazine's digital version, Brides.com....but not about makeup.  Um...what?  Yes, I am a makeup artist who specializes in weddings, but this time, they wanted my expert advice on.... wedding day snacks!  I've been around the wedding block, and can definitely share some advice on everything that happens on wedding day, good and bad. They shared part of what I had to say, but I wanted to go ahead and include the full enchilada (see what I did there?!?)
A very graceful faint
 captured by MVision Photography
Food...I think by now most girls realize that yes, they do need to eat something on wedding day...you don't want to wind up fainting before the first kiss, right?


 It can often take several hours while everyone gets ready, plus more time to take pictures...you and your wedding party will need energy to get you through an exciting, and long day. OK...so you know you and your girls need some snacks, but what?   The options are endless, but the ideal choices are tasty, nutritious and of course MESS FREE snacks and drinks.
 
As a makeup artist,  I'm with the bride and her bridesmaids all day as they get ready, and I've seen girls snack on everything from bags of chips and beer to a fully catered lunch with waitstaff and champagne..and everything in between!  I actually have lots of info to share, on what works...and what doesn't.....

Here are my pro tips for wedding day snack success:

1. Stainmaster - Sounds like common sense, but there should be no red wine, no cupcakes with brightly colored frosting, nothing with sauce. I have seen all of these items spilled onto dresses, chairs and carpeted floors of venues...not worth the risk. Shout Wipes and Tide pens can only do so much (and yes, I do keep both in my kit!) Frosting and hard candy can also temporarily stain teeth and tongues...cute when you're 4, not so cute when you're a grown woman about to get married.
Photo:  news/yahoo.com


2. Straws are a must - Whatever beverages are being served, provide some fun and colorful straws...even for bottled water. Once makeup is applied and lipstick is on, it's the only way to ensure it stays pristine. (Several retailers sell
Photo: Etsy.com
really cute covered mugs and cups with built in straws in every style from rustic to modern that can be custom ordered for weddings!) Try to avoid open cups, use travel cups or even take out cups with straws to avoid spills if you can. Exception?  Champagne flutes, naturally!  Worth the risk and besides, champagne is practically clear. ; )

3. Bite size everything! Mini-desserts, mini quiches or other similar snacks, mini-sandwiches....anything tiny that can be popped into the mouth in one bite (no plasticware or plates needed) is easy and mess free. Avoid anything that has to be cut or eaten with a fork and knife. Bonus points for goodies on skewers or toothpicks that keep hands clean too!

Photo: wannabite.com
 

4. Avoid the dreaded orange dust - If you're a casual, junk food snacker, you know what I'm talking about!  Stick to popcorn or tortilla chips....skip the Cheetos, Doritos and similar snacks. That pesky orange dust has a way of getting on EVERYTHING!

5. Classic Standbys - Crackers and pre-cut cheese cubes aren't exactly exciting, but always easy and mess free. String cheese is great too, it can be unwrapped as needed. Bite size carrots and celery. Bite size fruit is good, but avoid anything really juicy, like berries....apple slices are easy and mess proof.

6. Watch out for Kiddos! Less food related, but it's a key point...keep those adorable small children out of the "get ready" room if at all possible. I've seen countless wedding suites laid out with a spread of snacks and all of a sudden, there's a ring bearer or flower girl digging in and food is flying!  This means mustard and that danged frosting on chairs (prime for you to sit and get on your gown), or various snacks on the floor that can be slipped on, or wind up on clothing. Have kids snack beforehand in a separate area if possible. 


7. Wash your Hands Before Getting Dressed Last tip for mess free snacking? Everyone should wash their hands before getting dressed or helping the bride get dressed, just in case! I once had a maid of honor get blue frosting (blue!) all over the back of the bride's dress....it was on her hand from a recently eaten cupcake and she didn't realize it until it was too late....and on the dress.  OOPS!


So, there you have it...an entire post NOT about makeup or beauty....but about stress-free, MESS- free snacking on wedding day!  What snacks did you have pre-wedding? Any food disasters you wish you could've avoided?  Share in the comments!

Oh, and be sure to check out BRIDES Magazine!  They've got everything you need to know about dresses, beauty, and a million other things to help you plan the best wedding possible..including tips like these.  They're celebrating 80 years with their gorgeous October issue too!

 
(

Wednesday, September 3, 2014

Back to School - Part 2 - Color You Gorgeous!

Fall is my favorite season!
As I mentioned in my previous post, I really, really dig fall. As a kid, I grew up in Wisconsin, where fall actually meant crisp air and falling leaves and back to school in September.  In Fort Worth, where I currently live?  Not so much.  Kids start school in August and fall doesn't hit until much later in the year...late October, early November or so.  I relish in it once it arrives!  Whether you're in school, you're a teacher, going to work every day or a mom running kids to class, Back to School is a state of mind...the end of summer, time for transitions.  If you read Part 1 of my Back to School beauty tips (if you missed it, click here to read), then your skin is in shape...now it's time to add a little color to your life!  What are some easy ways to switch up your makeup routine this fall?  Read on....

 
Change up your lip game -  Fall is  great time to switch out your clear gloss or summer lipbalm for a creamy lipstick in a peachy/pink or even a deep berry...these colors look great most everyone and will work well with your new wardrobe too.  If you're not a lipstick fan, try a lipbalm/stain combo like Revlon's fall Colorburst Balm Stain in Crush or Smitten....it applies like a lip balm, but adds a sheer wash of color.
Stick to pinks, berries, reds and peachy shades....brown shades are everywhere in fall, but they're not always flattering, especially on paler skin tones.
Personally, I love a really deep berry for fall!  It looks great with heavier clothing and darker colors, plus it really gives a pop of color to my (year 'round!) pale skin....
One of my favorite shades is "Shame" by Urban Decay....even though it's not technically fall yet in Texas (still around 100 degrees daily), I had to break out a little wishful fall makeup last week!


Try a new way to blush - Have you been skipping blush on top of your tan this summer, or just using bronzer? When cooler temps hit, you'll need to transition to a little more cheek color to compensate for paler skin. Try a sheer, blendable gel formula (Try Butter London's Cheeky blush in Abbey Rose) for staying power to last through long days of class and after school activities.  Blend well onto the apples of your cheeks with a dampened Beauty Blender sponge...don't bring color too low!  For even longer lasting blush, try a gel formula, set with powder and then add a light dusting of powder blush on top.  Pinks, peachy shades, sheer poppy or berry all work on a variety of skin tones.  Go easy on bronzer in fall and winter, use sparingly for a light glow!

(photo credit: lipstickwithsunshine.com)
 
School /Work Appropriate Eye Makeup - Not sure how much eye makeup is appropriate for school , work or PTA meetings this fall?  Easy test.... if your eye makeup would fit in at the club or on a red carpet, it's definitely too much for daytime!  When it doubt, keep it simple.  A wash of buttery gold shadow (try L'Oreal infalliable shadow in Iced Latte) or shimmery taupe shadow provides a bit of definition and looks
(photo credit: seeyourinterest.com)
great on most everyone.....avoid bright colors and too much sparkle, save that for nights out. Dark brown or black liner traced lightly into lash lines,  plus mascara will give your eyes a bit of polish that looks great whether you're a sorority pledge or the one teaching a roomful of students....pretty much any situation! 
 
Fall-worthy Lashes and Brows - If your lashes are very light or got bleached out from summer, be sure to coat your lashes all the way down to the tip!  Choose a mascara with a tiny wand, such as one made for lower lashes, like Maybelline Lash Discovery.  Other ideas?  You can buy small disposable wands at a cosmetic supplier inexpensively to use with your favorite mascara, and Sephora has a great brush to try...it's a tiny fan brush that lets you paint on your favorite mascara root to tip. (Sephora Pro collection brush #220).
If your brows are like mine...much lighter than my hair and bleach out easily in the sun....be sure to fill them in a bit.  Use a bit of brow powder (Senna and Anastasia have great options) and a tiny angled brush.  Don't go overboard!  Just lightly fill in sparse areas and darken them up a bit if they're bleached out.


Follow these tips for a fresh look that is just right for fall!  What's YOUR favorite way to transition your makeup look from summer to fall?  Share in the comments below!


Thursday, May 15, 2014

High Fashion in Azle, TX....Glam Spring Shoot!

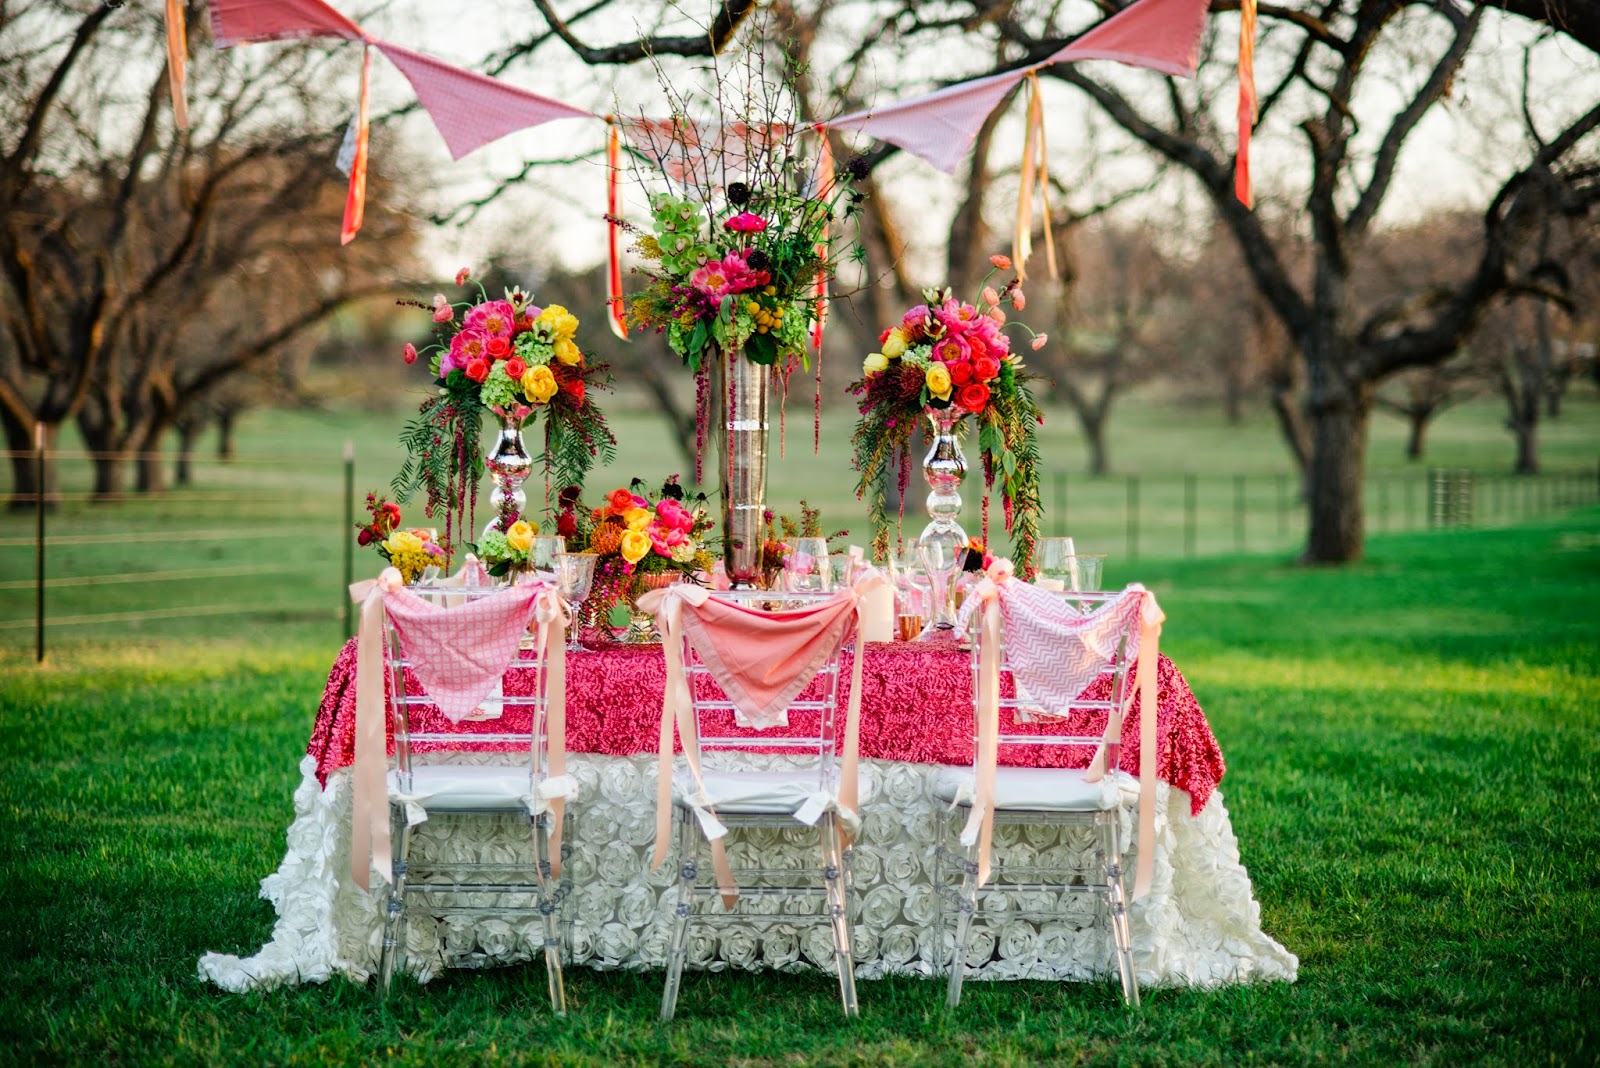
I LOVE to do styled shoots!  It's a chance to get creative and contribute to the overall vision by whomever is planning the shoot.  In this case, Angela Navarro of Inspiration Blooms called me up and said she had a shoot in the works and could I help?  You betcha!  Angela and Armando from Jade Special Events got to work on sumptuous linens, accessories, sweets and florals while Vanja from Vanja D Photography planned out how to capture her amazing signature style (just wait til you see below!!).  We got the fabulous Renn Traylor lined up for hair, the super talented Lauren Blake Paper for invitations and paper goods, and Wendy from Bliss Bridal agreed to provide a gorgeous gown.  A gorgeous gown in a super TINY size to fit the fabulous maybe-five-feet? model, Allanah Bennett!  Vanja had worked with her before and knew that she was perfect to bring this project to life and I'm telling you, this girl models like a 6 foot runway glamazon, so don't let her tiny stature fool you. The date was set...and reset (rain!) and then finally the day came when we all headed out to the Orchard in Azle, TX (about 30 minutes from downtown Fort Worth) to create some magic.  The backdrop? Idyllic country scenery in a real....you guessed it, orchard!

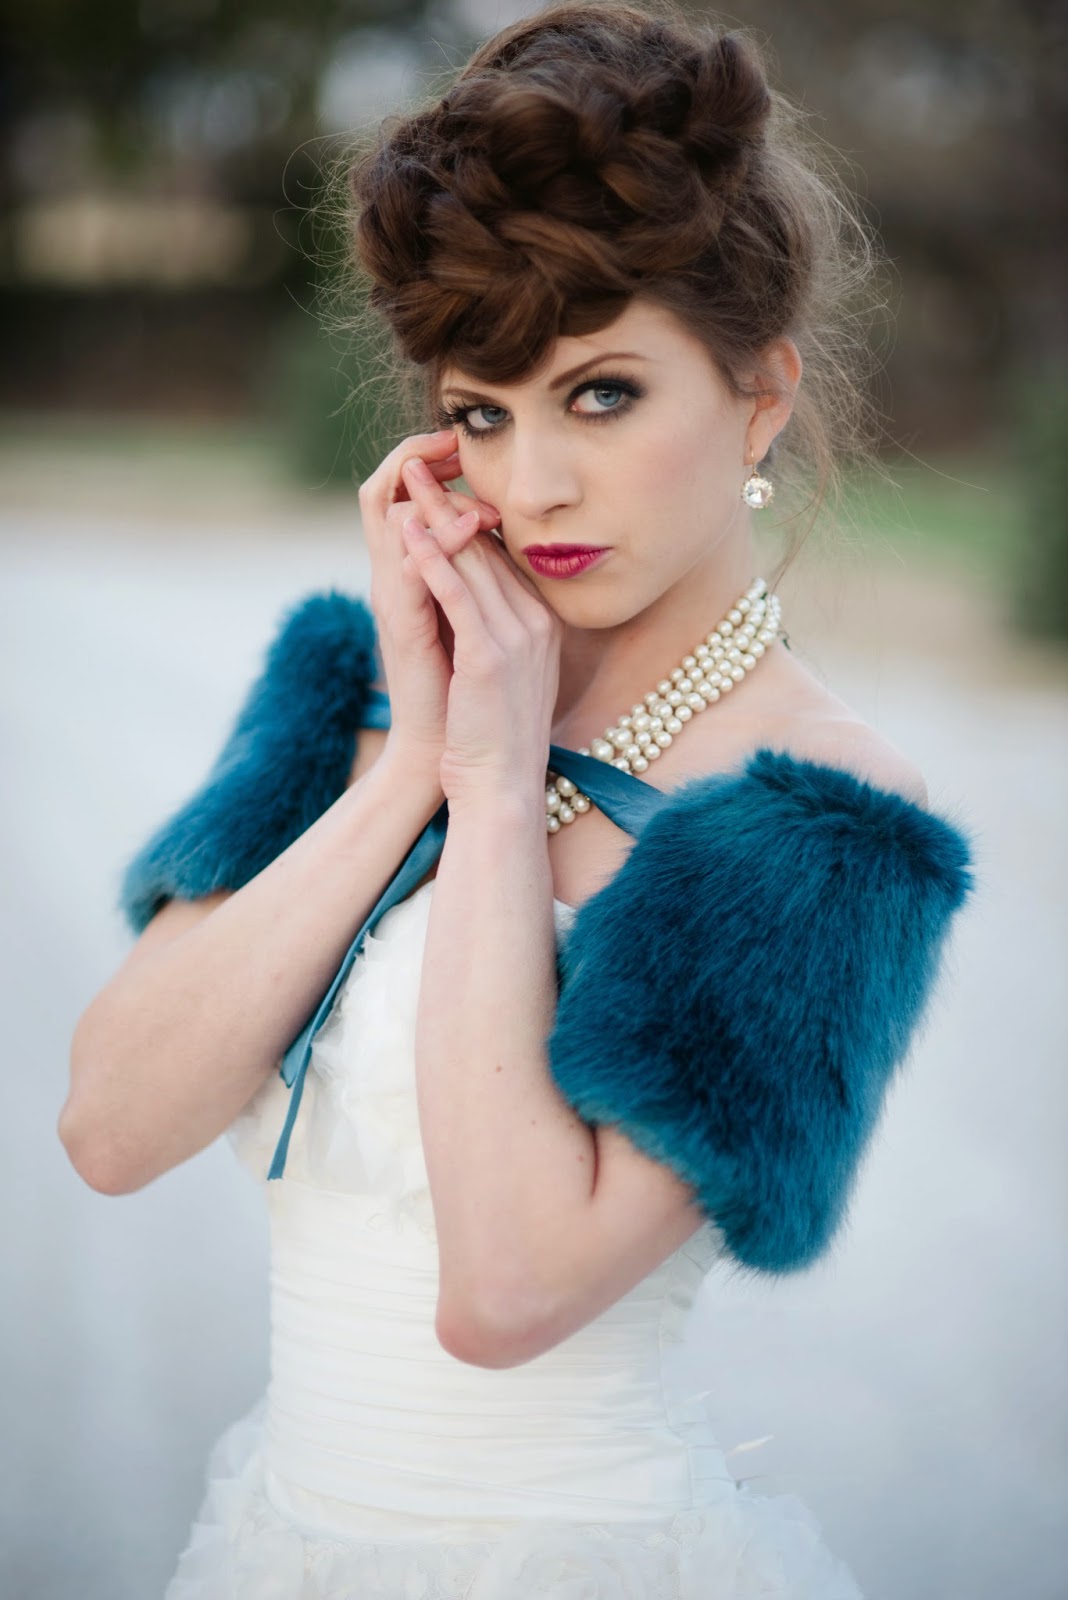
Renn started on Allanah's hair and began to craft an edgy/bohemian braided topknot...it was super intricate and looked incredible!  One of the most creative styles I've seen in a while and it was so perfect for the vibe we wanted to create.....


Then, on to my makeup chair!  I created a smoky/edgy eye using shades of acid green, forest green and black, punctuated with slightly spiky false lashes, pink cheeks and burgundy lips topped with a little fuschia eyeshadow for a plush and dimensional look.  Here's the before and after of hair and makeup:
 
We got Allanah into her dress, and then Renn and I stepped into our "stylist" roles...after considering many options, we decided upon on major strand of pearls and some delicate gold and crystal earrings to complete the look.  It's more high-fashion than a real wedding look, but that's what I love about it!  Here was a quick test shot of the completed look.....
Meanwhile, Angela and Armando had been crafting the colorful elements outdoors in vibrant shades of orange, fuschia and gold , and Lauren had created beautiful paper goods too.....


Ready to see the final images captured?  Here you go...Orchard fabulousness, glamour with a twist, rich bohemian...however you want to describe it, the final results were GORGEOUS!  This is only a small portion too, it was hard to narrow down which images to choose.  If you want to see more, check out Vanja's post here.  We had such an amazing time shooting this.....hope it inspires you!